-
Owner/Administrator


E-Trac User Settings And Programs
The following information should be helpful if you are new to the Minelab E-Trac. Hopefully it will assist you in shortening your learning curve as you become acquainted with your new machine.
Let's begin with each setting, a brief explanation of what each one does, and when they may come into play.
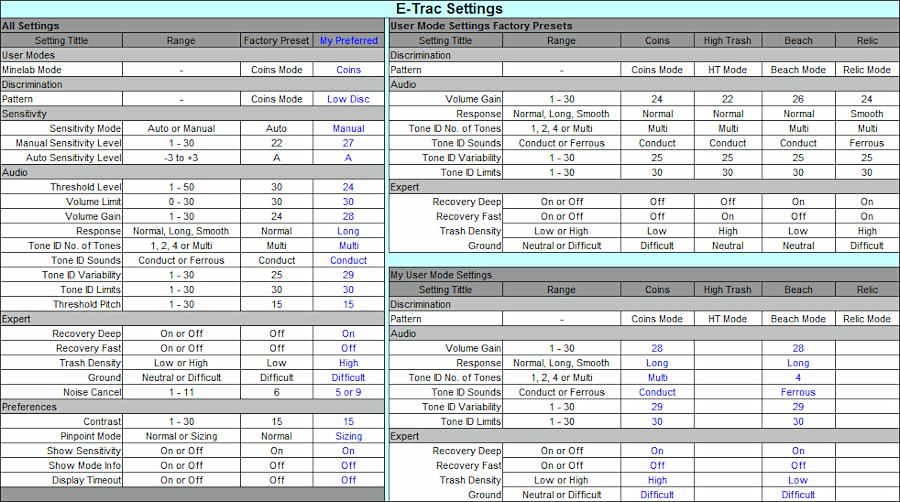
Below is a copy of the chart that is included in the E-Trac Instruction Manual. My own base settings, or starting point, are in blue. I will make changes as needed when out in the field, depending on the site being worked.
SENSITIVITY
Manual and Semi-Auto are available. The Semi-Auto setting allows the machine to operate at a sensitivity level it has calculated to be optimal for the site being worked. The user has the option of adding a value lower or greater than the sensitivity level chosen by the machine, that is, -1, -2, -3 or +1, +2, +3.
For example, if E-Trac has calculated a sensitivity of 19 to be optimal for a given site, the user can instruct it to also add +2 to that number, hence working at a sensitivity level of 21. While in this mode E-Trac will continuously monitor ground conditions, adjusting the sensitivity level accordingly. I have found that this works great when detecting high trash areas or where EMI may be a problem, while still providing excellent depth capability. I prefer working in manual mode at most sites, increasing the sensitivity level to 26 or higher, but I do turn to Auto Sensitivity when working areas where trash density is a challenge.
AUDIO
Threshold Level
This should be set to barely audible.
Volume Limit
This is the volume control. It should be set to maximum and left there. Rely on the headphone volume control to adjust the volume as needed.
Volume Gain
This setting amplifies the signals from deep targets. Many of us are used to seeking and listening for the tonal differences between deep and shallow targets, so the maximum setting may not be preferred. I have mine set at 28 from a possible 30. I find that it still provides a good deal of amplification on very deep targets while allowing me to discern the tonal difference between deep and shallow targets.
Response
For deep targets I prefer the Long setting, though I sometimes will try Pitch Hold. The latter is preferred by many for its ability to alert the user via a threshold change to a pitch corresponding to that of a target's tone range.
Tones
The E-Trac provides 1, 2, 4 and Multi tones. This allows for a good amount of flexibility and user preference. I like the Multi tones setting and use it almost exclusively. It does not appeal to everyone though, so also try 2 or 4 tones during your hunts to see which one appeals the most to you. There are others who use 2 tones along with the Ferrous mode when working cellar holes or other iron laden sites, and they do very well with it.
Tone ID Sounds
Conduct and Ferrous are available. Reading through many forum posts one would conclude that Ferrous tone in all metal is the only way to go when seeking deep silver, but I have found Conduct in combination with a low discrimination pattern setting to be phenomenal for hitting on deeply buried silver dimes. Yes, this setting will mean that you may be fooled by a few deeply buried iron targets, like rusty square nails, but even then the tones and repeatability of the signal can provide an experienced user with enough information to determine if the target is worth digging.
Tone Variability
This setting, along with Limits, allows the user to fully benefit from the E-Trac's tonal range, making it easier to identify highly conductive targets even among trash. With few exceptions this should be set at or near the maximum setting of 30. My personal preference is 29, though others may like a lower or higher setting.
Tone Limits
Set this to the maximum setting of 30 in order to maximize the tonal difference between targets. When used along with Tone Variability high conductive targets, such as silver, simply 'sing' and will be hard to miss.
Threshold Pitch
This one falls under the personal preference category. I like mine at the factory preset of 15.
EXPERT SETTINGS
Recovery Deep
The factory preset is set to Off. Make sure to set it to On! Weak signals will be amplified, allowing the machine to have more information to process, hence providing more accurate details on a probable good target. The signal on shallow targets will not be amplified. If working a site where all targets are shallow, for example an area where there is a layer of rocks covered with a few inches of soil, then set it to Off.
Recovery Fast
I now have this set to Off, even when working trashy sites. Having the setting to On allows the machine to recover quickly from target to target, lessening the chances that a good target will be missed during the reset period. It can very useful, but I have found the slight tone distortion to be too annoying for my taste. When working trashy areas I compensate by simply employing a very slow sweep. I have done very well at such sites without having to use this setting.
Trash Density
Having this setting set to High will allow the E-Trac to detect good targets next to rejected targets. Normally the signal from such trash, if it is the stronger signal, may cause the machine to ignore the weaker tone of a good target. This setting allows the machine to provide a signal for the strongest accepted target, even if next to a rejected target. I have it set to High at all times.
Ground
Most of the sites I work require this setting to be set to Difficult. I haven't had a need to set it to Neutral, though there may be situations where such may be required.
Noise Cancel
Though this can be set manually, I prefer the touchpad, allowing E-Trac to find the best channel for the site being worked. Simply turn on the machine, keep the coil elevated about 12 inches from the ground, and select Noise Cancel. It will take approximately 20 seconds for a channel to be selected. Start detecting once completed.
PREFERENCES
Contrast
Personal preference. I have mine at the factory setting of 15.
Pinpoint Mode
Normal
Show Sensitivity
On
Show Mode Info
Off
Display Timeout
Off
TIPS
I will often work a site known to have held old coins by selecting a relatively small area, gridding it, and working it slowly. If you decide to do such at your own sites, your sweep should be no faster than a 4 to 5 second count in each direction, and I would say that a slower sweep would be preferable if the area has many targets, such as pulltabs, aluminum screw caps, and other such trash. This requires a great deal of patience, and it will mean that you won't be covering much ground during each hunt. But it can be well worth the effort. Do this each time you are at the site, gradually covering much of the available ground. The E-trac can be worked faster than the SE however, as it is more forgiving with the sweep speed. When not working a grid I tend to speed up my sweeps while detecting open fields if targets and surface trash are few.
Deeply buried silver dimes will, for the most part, sound off very nicely on the E-Trac, though there are times when ground condition and trash density will cause an appreciable signal distortion on such deep coins. Carefully examine the high pitched tones, limiting your sweeps over the target to very short ones. This will allow the machine to provide you with more accurate information on the probable target.
Remember, the ferrous numbers may bounce somewhat on deep targets, going from 12 through 24 or higher. The conductive numbers tend to be more consistent, though they too will bounce somewhat. Use this information along with tones to help you determine if the target is worth digging. Personally, I rely on tones and use the display as a secondary target identifier. I should mention, too, that digging as many targets as possible during the first several trips out with your E-Trac is something you should be doing. It is a great way to become acquainted with what the machine is telling you on the many types of targets you will encounter during your hunts.
HH!
 Posting Permissions
- You may not post new threads
- You may not post replies
- You may not post attachments
- You may not edit your posts
-
Forum Rules


 Reply With Quote