Copper cleaning

del

Administrator
I figured I would start a thread to show off some of the before and after pictures and try to give some tips or directions on each example given.

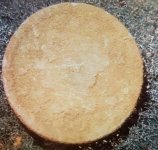
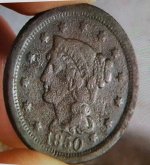
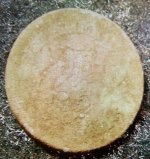
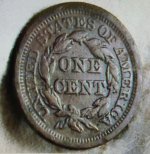
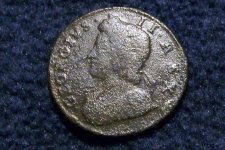
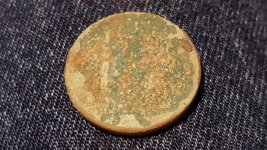
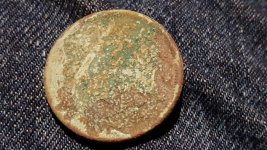
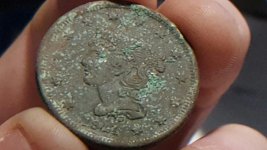
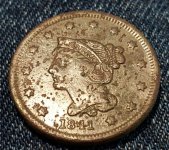
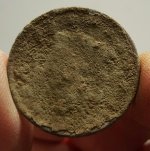
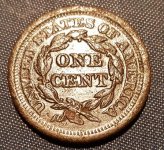
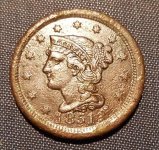
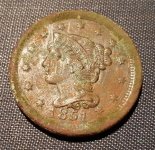
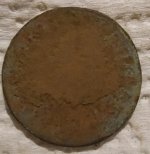
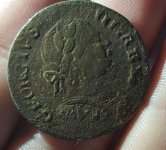
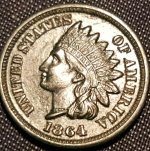
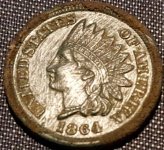
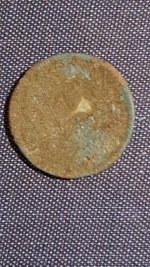
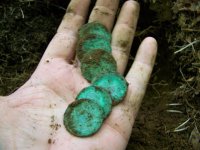
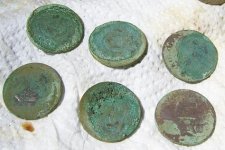
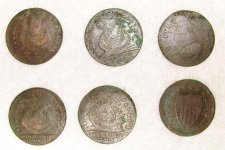
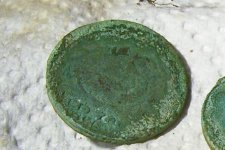
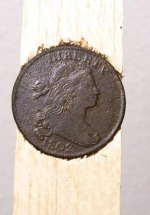
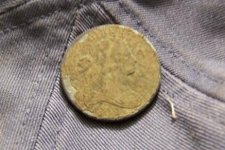
This large cent had a green hard stubborn "cement-like" layer , unfortunately it also had a small amount of pitting hiding under this layer but despite this i'm very happy with the results .
smilegrin.gif
I used a couple of stainless dental picks on the surface of this coin because the green corrosion was so hard . This is a very slow and careful as to not scratch the coins surface.
 

Attachments

  • april 1841 lg ct. front.jpg
    april 1841 lg ct. front.jpg
    54 KB · Views: 1,735
  • april 1841 obverse uncleaned.jpg
    april 1841 obverse uncleaned.jpg
    87.2 KB · Views: 1,737
  • april 1841 obverse partial picked.jpg
    april 1841 obverse partial picked.jpg
    88 KB · Views: 1,751
  • april 1841 obverse mostly picked.jpg
    april 1841 obverse mostly picked.jpg
    43.9 KB · Views: 1,660
  • april 1841 reverse cleaned.jpg
    april 1841 reverse cleaned.jpg
    142.4 KB · Views: 1,732
Last edited:
another very dirty Matron head large cent , always see what you can remove with a wooden toothpick lightly first before going to some harsher method. I started this coin by first placing it under a heat lamp and allowing it to completely dry out first . the dirt was very loose after and came off with the toothpick very easily .
 

Attachments

  • 1819 matron toothpicked.jpg
    1819 matron toothpicked.jpg
    99.2 KB · Views: 1,710
  • 1819.jpg
    1819.jpg
    54.9 KB · Views: 1,744
  • dirty matron.jpg
    dirty matron.jpg
    78 KB · Views: 1,700
Another large cent using this same method although there was some stubborn areas that needed some close attention , this coin was a recent find
 

Attachments

  • 1851 reverse cleaned.jpg
    1851 reverse cleaned.jpg
    73.5 KB · Views: 1,747
  • 1851 dirty.jpg
    1851 dirty.jpg
    47.8 KB · Views: 1,653
  • 1851 cleaned.jpg
    1851 cleaned.jpg
    70.8 KB · Views: 1,549
  • 1851 obverse partilly picked.jpg
    1851 obverse partilly picked.jpg
    60.4 KB · Views: 1,661
  • 1851 obverse dirty.jpg
    1851 obverse dirty.jpg
    51.7 KB · Views: 1,548
Another recent find was this Machin Mills Copper . I let the crusty dirt dry and it started flaking off around the edges . To promote this more once at home i placed the coin a few inches under a high watt light and it makes the dirt come off very easy with a light tooth picking. Then cleaned the surface with a q-tip wet with peroxide and then coated it with ren wax and buffed it to a sheen.
 

Attachments

  • 1787 Machin obverse dirty.jpg
    1787 Machin obverse dirty.jpg
    23.6 KB · Views: 1,702
  • Machin Mills obverse cleaned.jpg
    Machin Mills obverse cleaned.jpg
    33.7 KB · Views: 1,673
A very crusty Indian , these can sometimes be too far gone as Bronze disease can affect these coins . they usually have a broken or chipped look around the edges of the coin and can be brittle as to where a tooth pick can chip off the letters or denticles , you must be extremely careful on those types . This one wasn't that far gone and cleaned up very well with just a tooth pick .
 

Attachments

  • july 23rd indian front.jpg
    july 23rd indian front.jpg
    59.1 KB · Views: 1,684
  • july 23 indian tooth picked.jpg
    july 23 indian tooth picked.jpg
    47.2 KB · Views: 1,637
  • july 23 dirty indian.jpg
    july 23 dirty indian.jpg
    64.3 KB · Views: 1,675
Six coins i found from a spill a number of years ago , notice how bright green from just pulled from the soil . Also notice the Jersey copper on the right where its more reddish from the others , this is exposed and rough copper color . This side of that coin was on the outside and took the brunt of the soil damage and I knew this side of the coin was not going to look as good as the rest . The majority of these coins had the hard almost "crystal-like coating , no soaking in olive oil , hot peroxide would clean these. The green was a very hard and brittle coating and a tooth pick would just break before anything came off. This is where my dental picks came in handy to "pop" the hard stuff off. the coins underneath were beautiful .
 

Attachments

  • 6 green coppers.JPG
    6 green coppers.JPG
    74.6 KB · Views: 1,755
  • 6 all uncleaned.JPG
    6 all uncleaned.JPG
    54.6 KB · Views: 1,673
  • 6 mostly cleaned 1.1.JPG
    6 mostly cleaned 1.1.JPG
    50.2 KB · Views: 1,537
  • coinspill fugio before cleaning 1.JPG
    coinspill fugio before cleaning 1.JPG
    49.5 KB · Views: 1,676
  • fugio with flawed planchet obverse 1.JPG
    fugio with flawed planchet obverse 1.JPG
    39.4 KB · Views: 1,634
1802 large cent , on the edges of this coin i could see small patches of ruddy red exposed copper . This is never a good sign so I knew that the corrosion had undermined areas of the surface and its details . This prompted me to avoid any chemicals like peroxide as the peroxide will get into any areas and clean them out of dirt that the corrosion is hiding. As you can see the coin is a bit porous but still holding a lot of detail , if i soaked it in peroxide it may have loosened more of the dirt that held the detail together.
 

Attachments

  • 1802 front 1st.JPG
    1802 front 1st.JPG
    39.9 KB · Views: 1,687
  • 1802 obverse dirty.JPG
    1802 obverse dirty.JPG
    51.5 KB · Views: 1,724
Last edited:
Very nice tips ! I like the use of the high watt light. Never heard of this one.

Yeah those high wattage flood lamps work well , they can actually get the coin hot to the touch and speed up the drying and flaking of the crusty dirt.

You're clearly an expert. Look at that video. Scalpel on roman coins. I'm sure you'll like it ;)

https://www.youtube.com/watch?v=Bm0UKo0s49o

I would never consider myself an "expert" by any means just been cleaning these coins for more than 15 years now . I would never use a scalpel but some of the steel picks are very sharp and I do use them in the same way at times. I wish our copper cons held up as well as those old Roman bronze ones did . Thanks for the video .
 
Ok, so now I know where to send my coppers for cleaning. LOL.
Amazing job on those coins Dan! :clapping:
It's hard to believe that they are the same coins.
 
Ok, so now I know where to send my coppers for cleaning. LOL.
Amazing job on those coins Dan! :clapping:
It's hard to believe that they are the same coins.

Lol , Don with some practice and a little bit of confidence anyone can get these results form their coins . Seeing the true surface condition of the coin is important on how to clean it but there are some coins that are so far gone that cleaning will only make them worse . This I believe is the most common mistake for many trying , they get a dirty copper and just plop it into some chemical to remove it when they were'nt paying attention to what the coin surface's looked like or condition. Then they blame the chemical for "ruining" it .

Thanks Don .
 
This is a fantastic post! I have ruined too many coins and tokens by not having the patience or the knowledge on how to get the best results for the particular coin. I'm going to put some of these methods to work this winter and will post before and after pics.
 
This is a fantastic post! I have ruined too many coins and tokens by not having the patience or the knowledge on how to get the best results for the particular coin. I'm going to put some of these methods to work this winter and will post before and after pics.

Thanks Donnie , I often tell new people to put their decent shaped coins away somewhere and practice on the really toasty or shot coppers . Experimenting on these will give them the best hands on experience and confidence and they can't ruin a coin that already has no possible value . Then when they get some idea as to how chemicals or cleaning techniques affect coins they can go back to their salvageable ones with some insight .
 
Here is an 1850 large cent that was very crusty , even after it dried out good the dirt wasn't lifting up off of it . This one i soaked in cool water for about an hour and then placed it about an inch or two under the heat lamp (i did this a number of times) and slowly the crust started to lift up first around the edges . The reason the dirt was holding on is because the coin was a bit porous and after i could tell that it wasn't real bad i did give it a hot peroxide soak . it came out pretty nice despite the damage it already had.
 

Attachments

  • 1850 uncleaned.jpg
    1850 uncleaned.jpg
    84.7 KB · Views: 1,722
  • 1850 cleaned.jpg
    1850 cleaned.jpg
    85.8 KB · Views: 1,596
  • 1850 reverse unclean.jpg
    1850 reverse unclean.jpg
    105.2 KB · Views: 1,649
  • 1850 reverse clean.jpg
    1850 reverse clean.jpg
    77.2 KB · Views: 1,727
Seeing the true surface condition of the coin is important on how to clean it but there are some coins that are so far gone that cleaning will only make them worse . This I believe is the most common mistake for many trying , they get a dirty copper and just plop it into some chemical to remove it when they were'nt paying attention to what the coin surface's looked like or condition. Then they blame the chemical for "ruining" it .

Truer words have never been spoken Dan. I admit I did that to a few coppers until I started copying your techniques. These days for me, every copper gets "dry cleaned" first to see what condition it is really in. Quite often, "dry cleaning" is all they will get.

Excellent post.

Jeff
 
Great thread thanks for sharing.

Your welcome Gaspipe , I hope some of it was helpful .

Truer words have never been spoken Dan. I admit I did that to a few coppers until I started copying your techniques. These days for me, every copper gets "dry cleaned" first to see what condition it is really in. Quite often, "dry cleaning" is all they will get.

Excellent post.

Jeff

Jeff we all have had bad experiences on coppers when first starting out , there wasn't forums around to help out when i first started . I think we owe it to those just starting out to help and try to keep them from making the same mistakes we did early on . Thanks for the input Jeff.
 
A king George II pictures of recent out of the hole and partly cleaned and then cleaned better with the Eurotool scratch pen.
 

Attachments

  • 1734 King George II.jpg
    1734 King George II.jpg
    68.6 KB · Views: 1,555
  • 1734 kgII FRONT 1.JPG
    1734 kgII FRONT 1.JPG
    55.3 KB · Views: 1,636
  • 1734 cleaned obverse 1.JPG
    1734 cleaned obverse 1.JPG
    83.1 KB · Views: 1,604

Forum statistics

Threads
23,565
Messages
238,062
Members
3,781
Latest member
kasmalat
Back
Top